from Rob Legg Yachts | |||||
|
|
|
|
|
||
Episode 3: Designing the RL28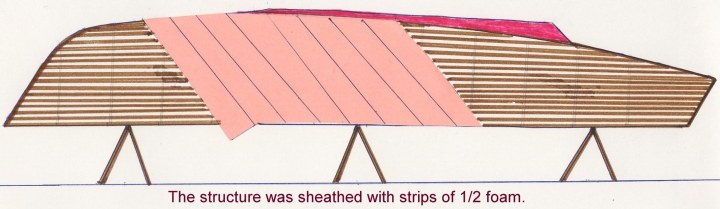 The idea was to plank over the frames with 1 ½ x 5/8 battens spaced about 2" apart. This proved to be a quick and easy job as the battens just fell into place and only required one nail on each frame. Now, ready for sheathing with the foam, I enlisted the help of David Mogg (David was to later design and build the 30 ft Starfire and became a marine surveyor). We cut the ½ inch thick foam into six inch wide strips, shaped and laid them diagonally over the form, fastening them with screws from the inside, using some 200 a side, it was a tiring job working overhead and very cramped up around the bow. When both sides were complete, the stem, keel, and skeg were shaped up from blocks of foam. The sheathing complete the whole structure had to be sanded off till it was fair smooth shape. This proved to be a bigger job than we had anticipated as the foam material was a lot tougher than we thought. We used a six foot long board with sand paper attached, one of us at each end and it took several long days to complete. When all was fair and true a layer of fibre glass matt and resin was laid. We used a waxed resin as a lot of sanding was to be done on each successive layer. The matt was followed by woven rovings, and the hard work really began, sanding off the overlaps before the final layer of matt. The fibre glassing complete and all sanded down a thickened application of flow coat was applied, and when cured, this was sanded until only a matt surface remained. This was repeated until we had a perfectly smooth pigmented surface with a matt finish. Next the final preparation began, using very fine wet and dry paper, followed by a cutting compound, and then the whole surface was buffed up using Brasso to bring up the final finish. The whole exercise took about a month for two men, we had worked six days a week and sometimes twelve hours a day, and how our arms and shoulders had ached, but I would guess that would be only be about half the time it would take to build a conventional wooden hull to the same degree of finish. |