from Rob Legg Yachts | |||||
|
|
|
|
|
||
Episode 8: Designing the RL28
The interior was now nearly complete and with most of the fittings on hand, it was time to start
on the final fitting out.
Go back to Previous Episode | Go back to Index | Go on to Next Episode
The first keel had arrived from the foundry. It was a surprisingly smooth and fair casting. We had previously learnt to leave on the scale as it was good protection for the metal underneath and never seemed to show any corrosion, so we filled rather than ground. Three coats of tar epoxy had proven a very durable coating on the 24's keels, so the 28's received four coats. Our vertical drill press would not handle the large drill needed for the pivot hole, but a local engineering firm had a magnetic base portable drill and that worked fine. 
Fitting the keel turned out to be easier than we had anticipated. A dolly with heavy duty casters had been made up to take the hulls, and the keel was sat upright on this and the hull lowered down over it, a gadget had been made to hold the keel upright that folded down as the boat was lowered.
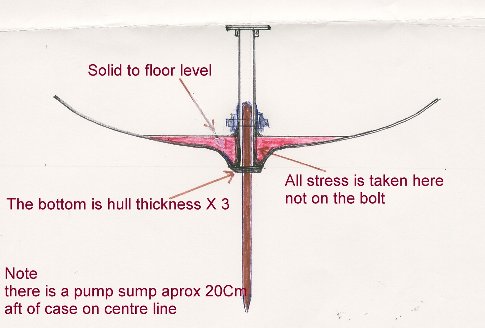
An important note for owners. There is an over size hole in the keel itself and the side pressures are taken by the solid section of the hull, which is immensely strong. (see sketch) Do NOT tighten the nuts nor remove unless there is a leak, and if there is just loosen the nuts, reseal with Silicone, and retighten the nuts to just over finger tight. The best medicine for your keel is to simply move it up and down with the hydraulics on occasions when the boat is getting little use. This will help keep the plate free from fouling and free the bolt from any corrosion. Consider this: If you tighten the nuts with a ten inch wrench and use ten pounds of force then the nut will exert over 1000 lbs of side pressure on the sides of the case. Just imagine how much damage that could do!
Back to the story. The next fitting I picked up was the hinged mast tabernacle , the hinged part looked weak, so I put it in the vice, gave it a twist, and sure enough it broke. It would be a disaster if it broke while the mast was being raised. There was nothing else on the market, so we made up our own. All the rest of the fittings worked out well. The little pads on deck made fitting easy and no measuring was needed. 
Previously we had made most of our own trailers, but new restrictions now made this impractical so we chose " Tinka trailers" 20 ft power boat trailer. It was ideal! Whilst a power boat needs support right up to the transom to carry the weight of the power unit, a sailing boat does not. The capacity was right; it had power brakes, and a very clever device for pushing the boat off several feet. We calculated that the first trailer we bought covered over 50,000 km over the next few years. It delivered a boat up to Darwin, took us down to Port Pirie, and to Melbourne three times in three months, as well as all the local launchings. At last we had the first boat ready for the water (more or less). At least we could go for a sail, and our sail maker was bringing up the first suite of sails the next day from Sydney. This was an exciting time for me. I didn't get much sleep that night thinking through it all just in case something was missed. |


